Wednesday, March 12, 2014

New in the Shop - Polymer Clay Beaded Lanyards

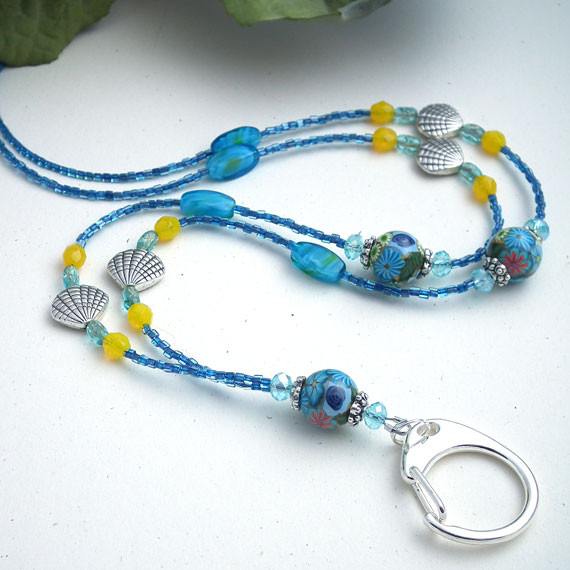
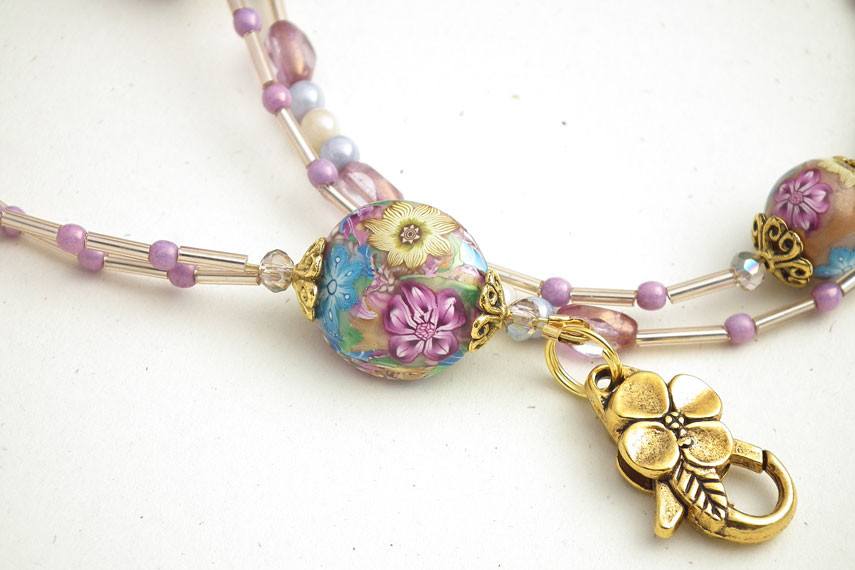
New Polymer Clay Beaded Lanyards

Beaded lanyards are popular, and I am always trying to catch up on my stock of these.  Since I hand make these, and many are one of a kind, it keeps me busy.  Polymer clay beaded lanyards are especially popular.  I purchase handmade polymer clay beads from various artists on Etsy.  So these lanyards are truly unique.

Here are the newest ones.  Each of these is available at my shop, Plum Beadacious.

 Large Disc Polymer Clay Beaded Lanyard

 Turquoise Polymer Clay Beaded Lanyard

 Plum Pink Polymer Clay Beaded Lanyard


Monday, March 10, 2014

Planting Seeds Indoors is Child's Play


Planting seeds indoors is child's play ...

when you get to do it with your 4 year old grand-daughter.  My grand-daughter spent the night with us on Saturday, and on Sunday she and I got to work planting flower seeds in preparation for this summer.  We had a good time together.

I purchased a variety of seeds, a large tray of starter peat soil pellets from Jiffy, and some plant markers.  Maggie, my grand-daughter, had fun pouring water all over these pellets so they could get moist and puff up.  We did that before breakfast, and by the time we had eaten our yummy pancakes, the starters were ready for us to plant the seeds.


Let the planting begin ~

Maggie took a pencil and placed a hole in each of the starter peat soil pellets.  I carefully cut open one package of seeds at a time.  We had a total of 72 peat soil pellets to use.  Imagine my surprise when I only had 8 seeds in the first package of seeds.  They are wave petunias, and were the most expensive of the lot.  I guess you only get a few because the wave petunias are still a newer variety of petunias (well not really, I think they have been around for about 10 years).  Anyhow Maggie planted those first and since I told her to place two seeds to a pellet, she didn't even get one whole row out of those.


We moved on to the other seeds which were much more abundant than the petunias.  Maggie and I marveled over all the different shapes and sizes of seeds.  The marigold seeds were long and skinny.  The coleus seeds looked like extremely tiny poppy seeds.  Each flower's seeds are unique.
Of course, Maggie got a little tired of planting seeds before we finished all 72 soil pellets, so grandma finished the job while Maggie munched on some popcorn left over from Saturday night.  It was still surprisingly fresh tasting.


Plants in their temporary home

The whole tray went downstairs to my family room to place in our big window there that faces west and gets lots of sun.  A plastic dome lid went over all to keep the moisture in. Now it is up to me to keep up with this every day.


Planting seeds is so much fun that my husband and I plan to start some green beans and sugar snap peas indoors as well.  Do you ever start seeds indoors?  Leave a comment with your tips and experience.


Wednesday, March 5, 2014

Celebrating 1000 Sales on Etsy


I am so excited!  I hit a milestone today.  I made my one thousand sales on Etsy!  To my wonderful customers, THANK YOU!


I started my current shop Plum Beadacious on Etsy in February 2008, so it took 6 full years to get to this point.  I was so green then, and lacked the knowledge I needed to be a successful handmade entrepreneur.  At that time I took some photos of my limited number of jewelry items, wrote what I thought was a good description, and posted them for sale.  I would go a month or so between sales, and I did not attend to it as well as I should have.
Yet it was a constant dream of mine to create beautiful jewelry and sell in on Etsy.  I bought books on the subject, read the information on Etsy, and constantly scoured the internet for help and advice on everything including identifying my market, taking good photos, writing good descriptions, pricing my work, and social media to get the word out.

Although I hit this milestone that seemed as though it would never come, it is pointing me onward to reach the next milestone.  I truly enjoy doing this business and would love to share with you about selling handmade products online.  If I can help someone else along the way, that would be wonderful.

Enjoy each facet of your small business or whatever it is that you do.

Monday, March 3, 2014

Etsy Sellers - Have You Been Treasured?

Where are your Etsy Treasuries?

Hey there Etsy Sellers!  Do you know how to find out if you have been treasured in an Etsy treasury?  You may not always receive a convo from the creator of the treasury to let you know.  You may find out if you scroll through your Shop Activity on your Etsy Dashboard.  But if you don't do that everyday, you could miss knowing about the treasury.  I love to know when one of my items has been featured.  So to find out every time you have been included in a treasury, you can use a nice simple online tool.  You can also copy the widget for that treasury and post it somewhere for everyone to see.

Craft Cult is the place to be to answer your questions.  When you go to this site, you will find a number of topics across the top of the page.  If you click on the one called Widgets, it takes you a page where you can select Treasury to find out if you have ever been included in any Etsy treasuries.

Etsy Treasuries

When you choose Treasury, you need to complete the following:
  1. Enter your user name in the field provided and press Enter.
  2. Select the button labeled "Lists Featuring" to find all the treasuries that people have made that include an item from your shop.
  3. You will need to wait a bit.  Craft Cult will then display the number of treasuries that have featured your work. I think 100 is the highest it goes, because mine always says 100 at this point even when I am added to a new treasury.
  4. Click on the dropdown arrow in the box below and a list of all the treasuries that include your products will appear.  Just choose one and click on it. A tiny thumbnail of it will appear to the right.
  5. To get the code for this treasury to use on your website, go to step three and choose a size that you would like the treasury to be on your website.  You may need to experiment with this depending upon where you are placing it on your page or post.  I use full size when I post them on my Etsy Treasuries page.  The one I used on this post is also full size.  Full size loads more slowly than the smaller sizes.
  6. Then click on snapshot or dynamic.  I choose snapshot.  Dynamic treasuries will change if a product is removed from Etsy.  Snapshot will show what originally was placed into the treasury.
  7. Click on Get Widget, and the html code for that widget appears.  Copy that code and paste it into your website in a place that accepts HTML code.
  8. These treasuries are so pretty.  Remember that when you post a treasury, you are also spreading the Etsy Love.  There are many seller featured on each treasury.

    Share the Etsy Love!


Friday, February 21, 2014

Sewing Scissors Trivia

Did you know that scissors were invented around 1500 BC in ancient Egypt? They were forged into a U shape, and you pressed the ends together to cut something.  These scissors were forged from bronze.  Later around AD1000 the Romans introduced cross blade scissors.  Thank goodness for that.

Anyhow,  you may wonder why I am writing about this.  I have become interested in sewing scissors in particular since I started creating beaded sewing scissors lanyards for one of my customers.


As I started searching the web for pictures of sewing scissors, I found many pairs of them are "stork" sewing scissors.  The history of these is a fun piece of trivia. Midwives in the 1800s would keep a pair of these "stork" scissors in the sewing baskets.  They were actually used by the midwife to clamp off the umbilical cord after birth.  They were not intended to be scissors, but were clamps.


Because they were in the sewing boxes, manufacturers began making stork sewing scissors.  These are small sharp scissors most often used for embroidery work.  Stork scissors are still made today for embroidery.

Many of the scissors made in the past are absolutely gorgeous.  Some are even made from sterling silver. Those in the picture here are from 1890.  They have a sheath to protect the blades.
I have been creating beaded lanyards for scissors for one of my customers, and now have made some of them to sell to anyone interested in them.  I will bring you pictures of these next week.
Meanwhile, visit my Pinterest board where I have collected many pictures of sewing scissors.  Some have storks, one has a swan, one has an owl, and many are elegantly decorated with lots of swirly patterns.

Wednesday, February 19, 2014

Packaging Jewelry for Shipping to Your Customer

How do you package your jewelry before shipping it to your customer? If you are a buyer, what do you want to see when your package arrives?  From my experience, a buyer wants a special experience when purchasing a handmade item.  I have found a way to do this that is fun for me and for the customer. I have developed a way to package my jewelry items to send to my customers that meets with their approval.

This is not gift wrap. It is my normal everyday wrap when someone purchases an item from my shop. I want them to feel good about the purchase from the moment they open the envelope. I use a 6x9 padded mailer envelope, so that provides a good sturdy shipping envelope for the small items I send out. For larger orders, I go to a small priority shipping box. Once the customer opens the envelope and pulls out the item, here is what she sees.


I use small cello bags.  In this case I use Wilton bags designed for cookies and such.  This is the Garden Party theme.  It is my favorite.  I place the item into an organza bag, wrap that in a thin foam packing sheet, and place it and a couple of my business cards into the cello bag.  Then a cute sticker that I ordered from an Etsy seller is used to close the bag.  It provides a thank you, my name, and my website address.  I also add a receipt into the envelope. When the customer opens the cello bag and removes the foam packing, she sees the item in an organza bag.  I try to color coordinate with the jewelry if I can. 

 I have been surprised to hear back from some of my customers about the packaging once they receive their order.  I am delighted with their responses.  Here is some of the feedback I have received.
 I loved the way it was packaged, made it fun and exciting to open.~ Becky 

Packaged beautifully in gift pouches ~Sophia 

It came in a lovely gift wrapping that made gifting it perfect.~ Christine 

The packaging was almost too pretty to open.~Merry 

There are many creative ways to package your items for shipping.  Please share with us what you do for this.


See Other Posts

Related Posts Plugin for WordPress, Blogger...