Monday, March 31, 2014

Bead Show - Treasure Trove of Goodies

Bead shows are a treasure trove

For those of us who create handmade beaded jewelry, we look forward to bead shows with great anticipation.  I use beads for all my beaded lanyards and chain lanyards, so I am always on the lookout for new beads of good quality at an economical price.


Rings & Things Bead shows

Did you know that Rings & Things travels all over the United States to display their wares?  They offer wholesale prices minus an additional 15% off to those who have a valid sales tax number.  Last week they were in Denver.  It was a 60+ mile drive for me, and one that I willingly made.  After all my dear husband, Bill, served as the chauffeur to and from the event, and he also sat in a chair in the lobby and waited for me to do all my shopping.

Shopping took me two plus hours at this show.  Am I spoiled or what?  They have their full schedule of all cities for 2014 at their website.

Rings & Things has all kinds of beads.  Most of those strands at the show were semi-precious stones in all shapes and sizes.  Many of the strands were $25.00 or less retail, which means they were about $10.63 or less per strand at the final mark down price.


They also had Austrian glass pearls at the same type of discount.  I am partial to these fine glass pearls.

In addition to the semi-precious stones and Austrian pearls, there was a wide variety of pearls from very inexpensive to the pricier variations.  Towards the back of the bead show were the bargain tables where you could find Chinese crystals, Czech glass beads, and some other things of which I don't remember the names because they did not interest me.  I purchased about 20 short strands of Czech glass beads, but did not get any Chinese crystals.  I have lots of those, and the ones there did not grab my attention.


My final stash from the bead show had lots of goodies.


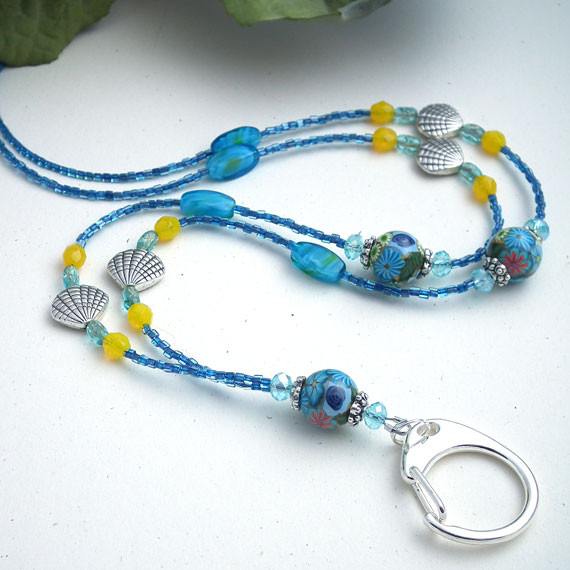
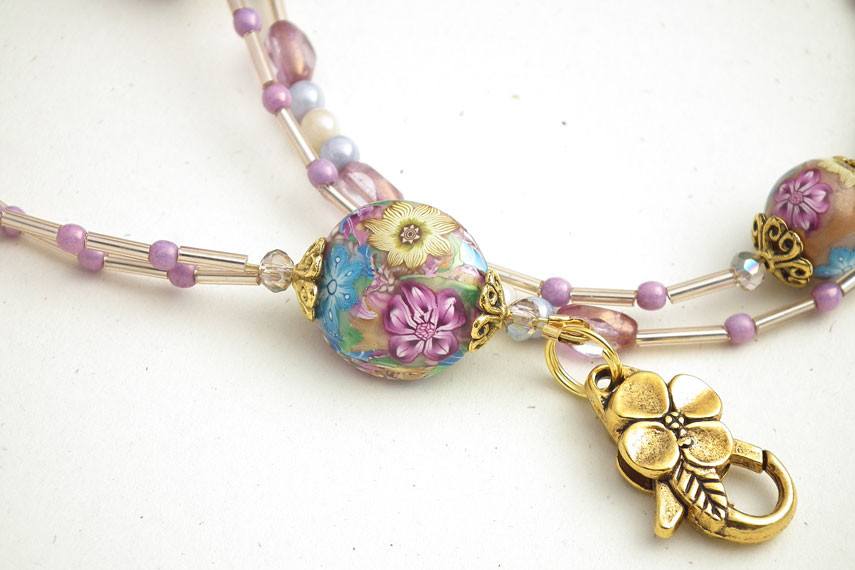
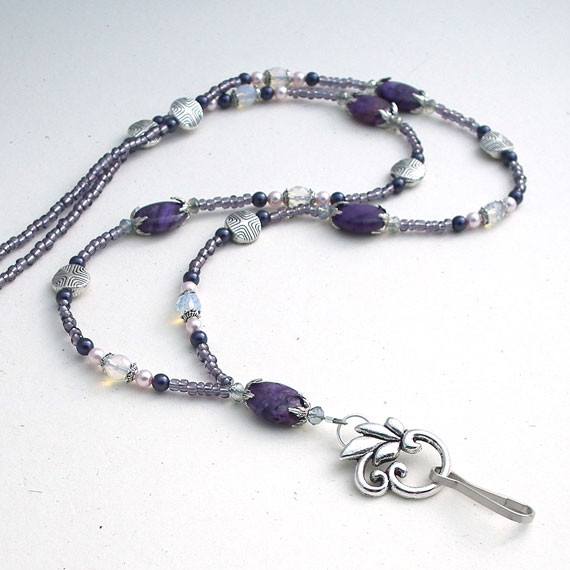
I already pulled out the crazy lace dyed purple puff oval beads, the faceted opalite round beads, some of the small Austrian pearls to make a beaded lanyard.  It is available for sale in my shop.

 Purple Crazy Lace Agate Lanyard


If you like to go to bead shows, please share your favorites in the comments section.  There are many all over the country.


Friday, March 28, 2014

Broken China Jewelry Book - Boho Chic Jewelry

 Boho Chic Jewelry


Broken China Jewelry Book

I first found Laura Beth Love online and started following her on Facebook.  She is the author of the new outstanding book, Boho Chic Jewelry, 25 Timeless Designs that is now on sale through Amazon.  I have always had an interest in broken china jewelry so I was very excited to pre-order her book which just came out on March 14.

When I received my copy, I poured over all the pages to understand better how broken china jewelry is made.  I found the instructions here to be very thorough.

What is broken china jewelry?

Broken china jewelry is made from small to medium pieces of china broken from a dinner plate, saucer, teacup or other piece of china.  The jewelry can be made from a piece of china that is already broken, or you may select an area on a plate or other china piece to feature the design you want in your jewelry, cut that out with a glass saw, and grind it with a glass grinder.  The piece is then smooth and ready to transform into a piece of jewelry.  After that you apply foil tape to the edges of the piece, burnish it and then apply solder.  As you can see, it is a multistage process to create a broken china jewelry pendant, but it is so worth the time to do it.   The finished product is so unique, and it may contain wonderful memories if you use some china that you remember from grandmother's Thanksgiving dinners or some other special events.

 Layout of the Boho Chic Jewelry book

This book is a wonderful read about broken china jewelry, and it also addresses how to make jewelry from flat wear.  Each page of instruction is very clear, takes you step by step through the process, and provides excellent photos to help guide you along.  A full  list of supplies needed is presented at the outset.

The following instructions are provided in the first section of the book.  This is not an all inclusive list, but is a list of things you won't normally find in a book on beaded jewelry.
  • How to choose and apply copper foil tape
  • All about soldering - equipment, supplies and how to do it
  • How to do decorative soldering
  • How to apply patina
  • How to cut glass manually or with a ring saw
  • How to use a glass grinder and a jeweler's hand saw
After this general instruction section the projects begin.  There are 25 projects in this book, and they are incredibly beautiful.  Again detailed instructions are given for each project.

Photos of Laura Beth Love's work from her shop

This first photo is a necklace made from a piece of china cut from the rim of the plate.  It is then soldered with a decorative soldering technique.  You will learn to make this type of piece in the book, Boho Chic Jewelry.

Brown Toile English transferware necklace
The piece in the photo below has an entirely different feel from the one in the last photo.  Here the design came from the all over pattern of the plate.  You also learn from the book how to make a piece into a nice oval shape using a template, a glass saw and a glass grinder.  More decorative soldering completes the design.


I am so partial to this one in the photo below because I own a set of this china that has been in the family for 50+ years, and I really like hearts.  There are no instructions for hearts in the book, but once you learn to make a template, cut the china and grind the edges, I think you could tackle this.


If all of this sounds like a lot more involved than you want to be then please visit Laura's shop, Dishfunctional Designs Broken China Jewelry and purchase one of her beautiful pieces.  Laura's work has been featured in Country Living and other places.  Read more about her here.

You may also find Laura on Facebook and at her blog .

Wednesday, March 26, 2014

New Magnetic Badge Reels in My Shop

 Pink Rhinestone Button Badge Reel


Check out the newest magnetic badge reels available in my shop.

As you may know I specialize in making accessories for working women.  Most of these consist of magnetic badge reels and lanyards.  Today I want to show off some of the newer badge reels I have listed for sale.  These are all magnetic retractable badge reels.  These are my most popular items because they can be placed on a shirt or uniform, and they hang straight.  You can learn more about them in my product information in my shop.

Pink Button Decorative Badge Reel

The magnetic badge reel above is a new type of design for me.  I purchased some beautiful buttons with a bright pink pearl in the middle and rhinestones around the edge.  Then I found some lovely silver metal rings decorated with a hexagonal design that includes some flowers, and then scroll work around the edges.  My husband used his trusty grinder to remove the shank from the button.  Then I layered the button over the silver ring and glued all to the top of the chrome badge reel.  This is such an elegant piece for a professional to wear to work to hold her id badge.

Beautiful Photoglass Badge Reels

The next three magnetic badge reels are becoming more popular with my customers.  These are photo glass domes over a picture printed on heavy paper.  Then these are glued to the badge reel.  I like these because there are so many beautiful and fresh designs available.

 Flowers and Water Badge Reel


 Green Tree Badge Reel


 Pink Flowers Badge Reel


Nautical Compass Badge Reel

The blue magnetic badge reel below is another new idea for me.  I found these clever compass charms from an Etsy seller.  Instead of hanging the compass from a necklace, I carefully removed the connector ring from it, filed it smooth with a jewelry file, and then glued it to a blue badge reel.  Very nautical.  Ahoy, mate!
 Nautical Compass Badge Reel


I currently have over seventy different magnetic badge reels for sale in my shop.  Please visit my shop and check them out.  These make good gifts for your working friends.

How do you prefer to display your id badge at work?  Do you wear a lanyard, a badge reel, or some other type of clip?


Friday, March 21, 2014

Decorative Boxes Add Flair & Function to Your Decor

A collection of my decorative boxes

Decorative boxes capture my attention.

One type of decorative box that I really enjoy collecting is the paper ones in all shapes and sizes.   I find these at a variety of places.  My favorite places to find them are at antique malls, flea markets and garage sales.  Surprisingly, I have found many of these in perfect shape for rock bottom prices.  Sometimes I pay 25 cents, and sometimes $2.00.  New decorative boxes are also wonderful, and I sometimes buy them at gift shops. Joann's, Hobby Lobby and Michael's also carry beautiful decorative boxes in all shapes and sizes.

Here are photos of my paper decorative box collection.
These decorative boxes are displayed on the window seat in my bedroom.  I never sit in my window seat, so I use it to display some of my larger decorative boxes. 

  I love the blue and green color combo.  These are nesting boxes.  The small ones fit into the next bigger size until it looks like one large box.  I like to stack nesting boxes for the full effect of the patterns on them.
Blue and green nesting decorative boxes


This elegant soft green box with a black silhouette of a lady also sits on my window seat.  I found her at an antique mall in Fort Collins.  Tres Chic!

Tres Chic - silhouette of a lady and her dog on decorative paper box


 This decorative box features lovely hyacinths on a large square box.  It was one of the first decorative paper boxes I bought at a gift shop in Nashville, Indiana.  Nashville is one of my favorite places to spend a day, but it is no longer close enough to my home to go there on any regular basis.  I have used this for years now to store cute greeting cards that I use when giving gifts and sending out notes to people.

Beautiful hyacinths grace my decorative box for my greeting cards


The rest of my decorative paper boxes are used throughout my home.  Some contain things, and others are used purely for display. Enjoy looking at these and more on my Pinterest site.


Monday, March 17, 2014

Etsy Pocket Shop - Add One to Your Website


What is an Etsy Pocket Shop?

Have you noticed blogs and other websites that display a small version of the owner's Etsy shop at the side of the page?  Some people add what is called an Etsy mini to the page, and some use a widget developed by Craft Cult to add an Etsy Pocket Shop to the page.

Features of a Craft Cult Etsy Pocket Shop

The Craft Cult Pocket Shop has some additional features that I like.  There are tiny tabs across the top of it.  The visitor to your website can click on those for more information about your Etsy site.
  • Shop tab - provides scrolling pictures of the items for sale in your shop.  The visitor may click on this to go to that item in your Etsy shop.
  • Info tab - provides key information about your Etsy shop including number of items for sale and number of items sold.
  • Hearts tab - provides access to a list of all the people who have hearted an item or your shop
  • Feedback tab - provides your feedback comments from your Etsy shop starting with the most recent.

How to add an Etsy Pocket Shop to your Website

Take a look at my Pocket Shop at the right, and at the bottom left of it you will see the words "get a widget".  Click on that to go to the Craft Cult page that will give you the tools to put together your own Pocket Shop.  After you enter your Etsy username, you will see a variety of choices to be made for the style of your Pocket Shop.  Choose one of those.  I am using "vintage postcard".  Then you will need to select the style of animation you would like to use.  I am using "slide".  The next step is to specify how you want your items to display.  There are a number of selections available there.  Finally, click on Get Widget.  An HTML code will display for you.

Copy the code and paste it into the appropriate area on your website.  I am using WordPress.org so I paste the code into the side bar of my design using a Widget under Appearance.  If you are not sure how to do this, consult the Craft Cult Widgets page for instructions for your platform.
All of the instructions to create your widget are also available at the Craft Cult site  .

Friday, March 14, 2014

Breathtaking Color for the Senses -Holi Celebration


Be inspired by bold, brilliant breathtaking color this spring!

This morning I saw a small report on the Today show about a celebration of breathtaking color.  The celebration of Holi is beginning in India.

Origin of Holi Celebrations

This event is an ancient Hindu spring festival.  There are many stories explaining its origin. Various renditions of this do not necessarily match one another. One part of the story is of a dark complexioned boy, Krishna, who was jealous of fair complexioned Radha.  His mother told him to color Radha's face with whatever color he would like.  So this started a festival of breathtaking color that welcomes spring, and bright colors.  People throw brightly colored 
powders in the air and mix powders with water to paint their skins.
This grabs my attention because I love beautiful colors and am very visually oriented.  I have no desire to throw colored powders or paint my skin with them.  However, this whole celebration inspires me to take in the color and not to be afraid of bright beautiful hues.  Everything does not have to be subdued.

Web Resources for More Information

In the process of researching this holiday, I found a great website called Sensational Color.  I plan to spend some time on that site looking at all the information there.There is an excellent article there about the Holi Festival.

Another informative and graphic rich article is here.
Yahoo has oodles of wonderful images at this site.

Color Inspiration ~

I am always looking for good color ideas to use in my creative designs of beaded badge lanyards and other accessories.  I need to look beyond my usual color palette sources at all the breathtaking color in this world.

Wednesday, March 12, 2014

New in the Shop - Polymer Clay Beaded Lanyards

New Polymer Clay Beaded Lanyards

Beaded lanyards are popular, and I am always trying to catch up on my stock of these.  Since I hand make these, and many are one of a kind, it keeps me busy.  Polymer clay beaded lanyards are especially popular.  I purchase handmade polymer clay beads from various artists on Etsy.  So these lanyards are truly unique.

Here are the newest ones.  Each of these is available at my shop, Plum Beadacious.

 Large Disc Polymer Clay Beaded Lanyard

 Turquoise Polymer Clay Beaded Lanyard

 Plum Pink Polymer Clay Beaded Lanyard


Monday, March 10, 2014

Planting Seeds Indoors is Child's Play


Planting seeds indoors is child's play ...

when you get to do it with your 4 year old grand-daughter.  My grand-daughter spent the night with us on Saturday, and on Sunday she and I got to work planting flower seeds in preparation for this summer.  We had a good time together.

I purchased a variety of seeds, a large tray of starter peat soil pellets from Jiffy, and some plant markers.  Maggie, my grand-daughter, had fun pouring water all over these pellets so they could get moist and puff up.  We did that before breakfast, and by the time we had eaten our yummy pancakes, the starters were ready for us to plant the seeds.


Let the planting begin ~

Maggie took a pencil and placed a hole in each of the starter peat soil pellets.  I carefully cut open one package of seeds at a time.  We had a total of 72 peat soil pellets to use.  Imagine my surprise when I only had 8 seeds in the first package of seeds.  They are wave petunias, and were the most expensive of the lot.  I guess you only get a few because the wave petunias are still a newer variety of petunias (well not really, I think they have been around for about 10 years).  Anyhow Maggie planted those first and since I told her to place two seeds to a pellet, she didn't even get one whole row out of those.


We moved on to the other seeds which were much more abundant than the petunias.  Maggie and I marveled over all the different shapes and sizes of seeds.  The marigold seeds were long and skinny.  The coleus seeds looked like extremely tiny poppy seeds.  Each flower's seeds are unique.
Of course, Maggie got a little tired of planting seeds before we finished all 72 soil pellets, so grandma finished the job while Maggie munched on some popcorn left over from Saturday night.  It was still surprisingly fresh tasting.


Plants in their temporary home

The whole tray went downstairs to my family room to place in our big window there that faces west and gets lots of sun.  A plastic dome lid went over all to keep the moisture in. Now it is up to me to keep up with this every day.


Planting seeds is so much fun that my husband and I plan to start some green beans and sugar snap peas indoors as well.  Do you ever start seeds indoors?  Leave a comment with your tips and experience.


Wednesday, March 5, 2014

Celebrating 1000 Sales on Etsy


I am so excited!  I hit a milestone today.  I made my one thousand sales on Etsy!  To my wonderful customers, THANK YOU!


I started my current shop Plum Beadacious on Etsy in February 2008, so it took 6 full years to get to this point.  I was so green then, and lacked the knowledge I needed to be a successful handmade entrepreneur.  At that time I took some photos of my limited number of jewelry items, wrote what I thought was a good description, and posted them for sale.  I would go a month or so between sales, and I did not attend to it as well as I should have.
Yet it was a constant dream of mine to create beautiful jewelry and sell in on Etsy.  I bought books on the subject, read the information on Etsy, and constantly scoured the internet for help and advice on everything including identifying my market, taking good photos, writing good descriptions, pricing my work, and social media to get the word out.

Although I hit this milestone that seemed as though it would never come, it is pointing me onward to reach the next milestone.  I truly enjoy doing this business and would love to share with you about selling handmade products online.  If I can help someone else along the way, that would be wonderful.

Enjoy each facet of your small business or whatever it is that you do.

Monday, March 3, 2014

Etsy Sellers - Have You Been Treasured?

Where are your Etsy Treasuries?

Hey there Etsy Sellers!  Do you know how to find out if you have been treasured in an Etsy treasury?  You may not always receive a convo from the creator of the treasury to let you know.  You may find out if you scroll through your Shop Activity on your Etsy Dashboard.  But if you don't do that everyday, you could miss knowing about the treasury.  I love to know when one of my items has been featured.  So to find out every time you have been included in a treasury, you can use a nice simple online tool.  You can also copy the widget for that treasury and post it somewhere for everyone to see.

Craft Cult is the place to be to answer your questions.  When you go to this site, you will find a number of topics across the top of the page.  If you click on the one called Widgets, it takes you a page where you can select Treasury to find out if you have ever been included in any Etsy treasuries.

Etsy Treasuries

When you choose Treasury, you need to complete the following:
  1. Enter your user name in the field provided and press Enter.
  2. Select the button labeled "Lists Featuring" to find all the treasuries that people have made that include an item from your shop.
  3. You will need to wait a bit.  Craft Cult will then display the number of treasuries that have featured your work. I think 100 is the highest it goes, because mine always says 100 at this point even when I am added to a new treasury.
  4. Click on the dropdown arrow in the box below and a list of all the treasuries that include your products will appear.  Just choose one and click on it. A tiny thumbnail of it will appear to the right.
  5. To get the code for this treasury to use on your website, go to step three and choose a size that you would like the treasury to be on your website.  You may need to experiment with this depending upon where you are placing it on your page or post.  I use full size when I post them on my Etsy Treasuries page.  The one I used on this post is also full size.  Full size loads more slowly than the smaller sizes.
  6. Then click on snapshot or dynamic.  I choose snapshot.  Dynamic treasuries will change if a product is removed from Etsy.  Snapshot will show what originally was placed into the treasury.
  7. Click on Get Widget, and the html code for that widget appears.  Copy that code and paste it into your website in a place that accepts HTML code.
  8. These treasuries are so pretty.  Remember that when you post a treasury, you are also spreading the Etsy Love.  There are many seller featured on each treasury.

    Share the Etsy Love!


See Other Posts

Related Posts Plugin for WordPress, Blogger...